Building a Sopranino T-Stick
Bill of Materials
Sensors
Electronics
- 1 microcontroller Lolin D32 Pro
- 0.1uF capacitors
- 1K resistors
- 10K resistors
- 2M resistor
- Diode
- 10K pot
- Opamp
Manufacturing parts
- 30cm PVC Tube split in 2
- Copper tape
- 1 Li-Po Battery
- 1 on-off switch
- Heat shrink tube
- 1 end-cup with microcontroller base
- 1 end-cup with space for ON-OFF switch and battery holder
- 2 3D printed bases for Capsense
- 2 3D printed bases for IMU
- Mounting Screws
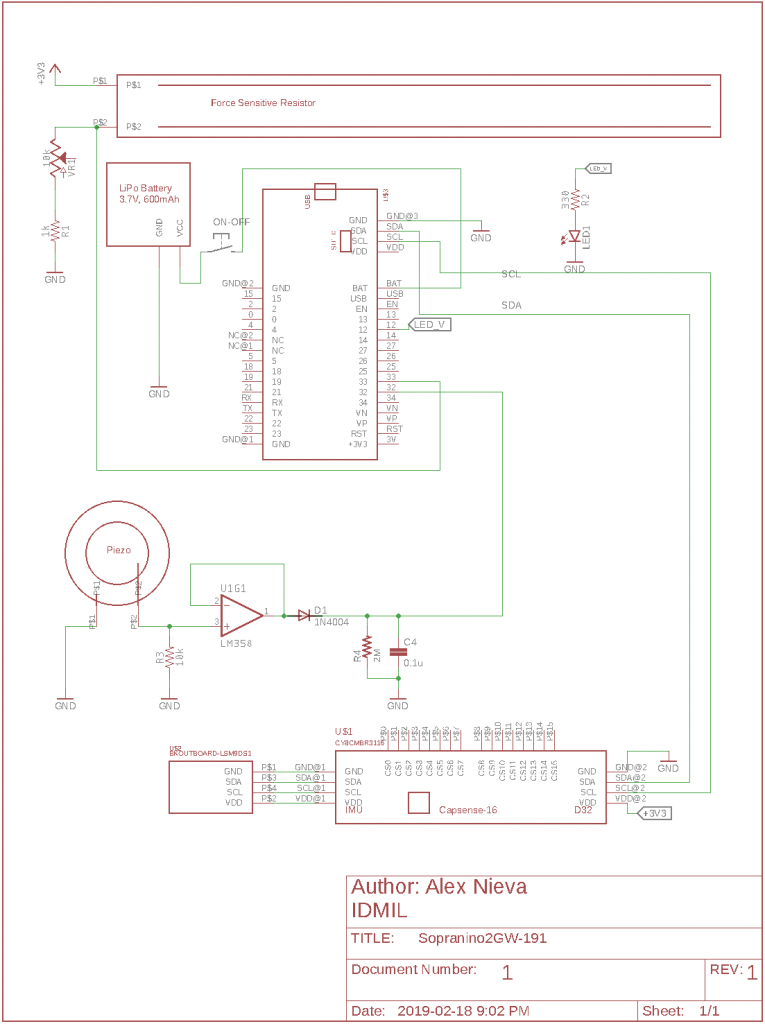
Schematic:
Instructions
Building the Frame:
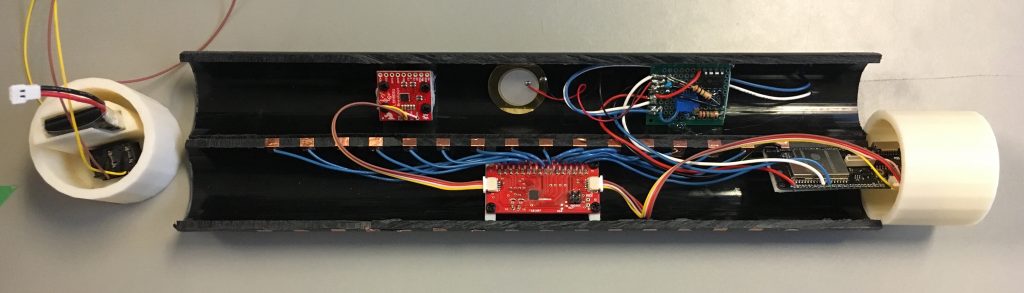
Cut the PVC in half as in the picture and tape the conductive tape 1.5cm apart. Length of holes assembly is 1.5 * 15 for 16 strips. That is 22.5cm. You need aprox. 8 cm of copper tape per strip.
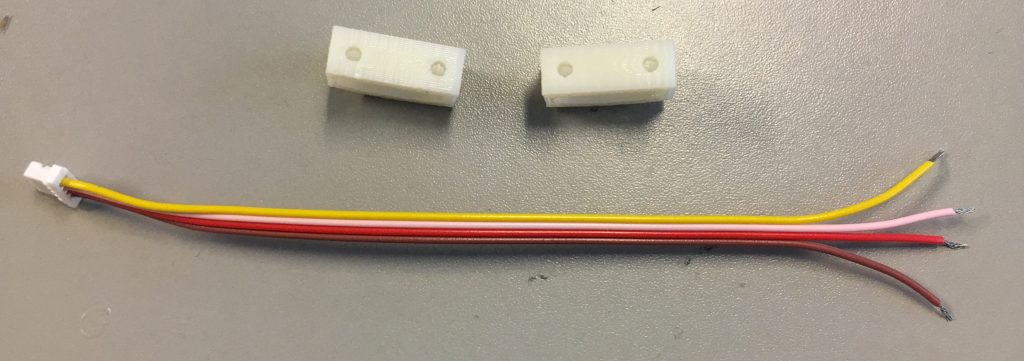
The Capsense breakout boards use 2 3D printed bases. It connects via a jumper cable with SH1.0 connectors to the D32 Pro.
CAUTION: THE CAPSENSE BOARD HAS THE CONNECTORS LABELED FOR THE IMU AND MICROCONTROLLER (Black mark). BE CAREFUL WHEN CONNECTING THEM BECAUSE OF A LAST MINUTE CHANGE IN THE PINOUT OF THE BOARD. SEE SCHEMATIC BELOW.
All the building tools can be found in the Machine Shop at the McGill Music Tech Department.

Notice this cable has the connectors backwards. You have to adapt the cables provided to match this configuration and length of your circuits.
IMU:
The LSM9DS1 IMU connects via another SH1.0 cable to the other socket on the Capsense for I2C communication. One end has the SH housing the other is open to solder onto the IMU breakout board. There are also 2 3D printed bases to attach the IMU to the frame.
The T-Stick Spatial orientation is defined as follows:
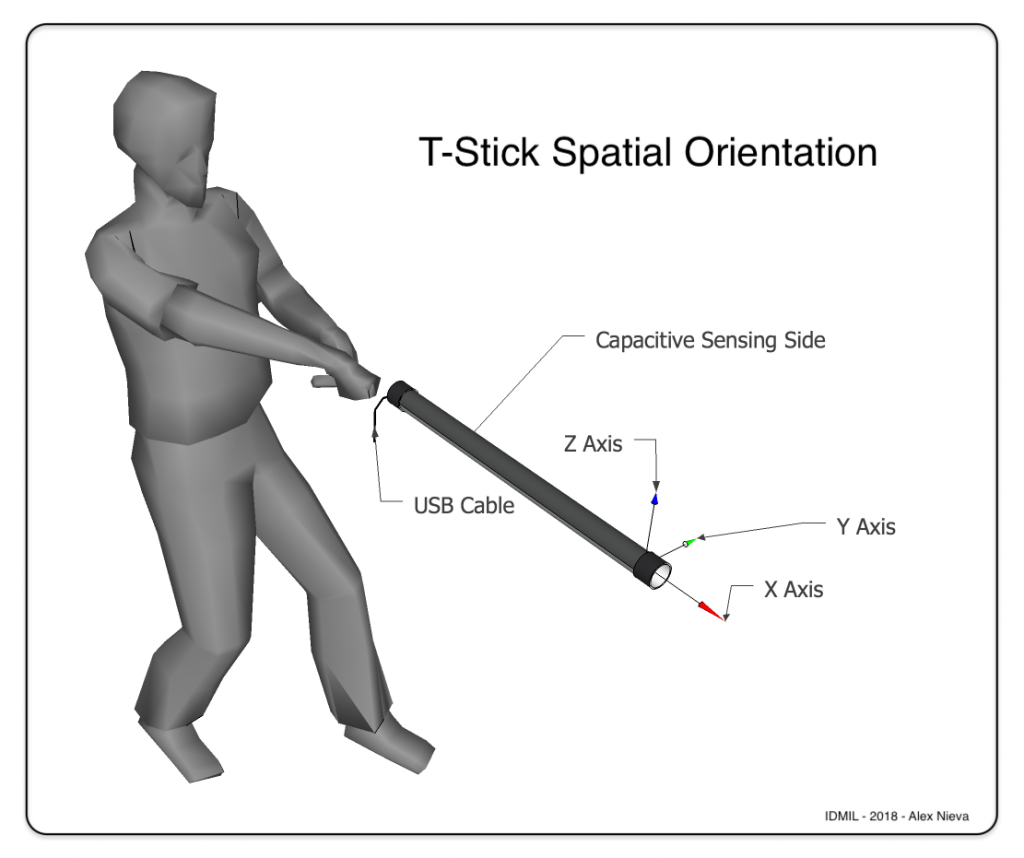
Please, install the IMU so that this configuration is kept consistent will the design.
FSR and Piezo Electronics:
The Force Sensitive Resistor and the Piezoelectric sensor are glued to the frame with epoxy or superglue. The signal processing circuit is all analog and needs to be soldered to a perfboard. The piezoelectric circuit output is to be soldered to pin 32 of the ESP32 and the FSR circuit output to pin 33. Electronic building tools can be found in the Electronics Shop at the McGill Music Tech Department.
Recommendation: Solder long cables to the FSR pins. They are very delicate. Put some heat shrink tube to reinforce the end of the fsr so it doesn’t break. If it breaks, it’s not repairable.
See: https://josephmalloch.wordpress.com/building-a-sopranino-t-stick/

Envelope Follower Circuit

Voltage Divider Circuit
Microcontroller:
The microcontroller to be used with the T-Stick is the Lolin D32 PRO:
See tech specs: https://wiki.wemos.cc/products:d32:d32_pro
Firmware:
Go to: https://github.com/alexnieva/TStick/tree/new2GWdesign/Sopranino/2GW/191 for the latest firmware to be uploaded to the D32PRO. Notice that you have to download the latest Arduino IDE version and setup the board definition. To do that go to: https://github.com/espressif/arduino-esp32
For the IMU you should clone the following libraries into your Arduino libraries folder:
https://github.com/adafruit/Adafruit_LSM9DS1
https://github.com/adafruit/Adafruit_Sensor
Page created by: Alex Nieva - alex.nieva@mail.mcgill.ca - https://idmil.org/people/alex-nieva/